User Guidance User Guidance
KS100 (Electronic) Gun Safe - Manual KS100 (Electronic) Gun Safe - Manual
PRE-USE Instructions
Important Safety Instructions
- DO NOT use rechargeable batteries or any other type of non-alkaline battery.
- DO NOT mix old and new batteries. DO NOT mix alkaline and standard batteries.
- DO NOT lock the key and the USB cable inside safe.
- Connected USB port CAN NOT charge the battery.
- DO NOT leave the safe in extreme weather conditions. Battery power may be affected.
- DO NOT store loaded firearms in this unit. Firearms are serious in nature and must be treated with respect and stored responsibly.
Unpacking Guide
Using the Backup Key to Open the safe
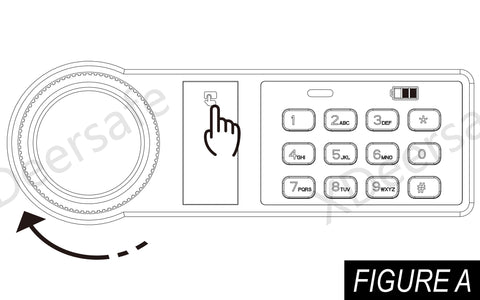
- Press the top of the key cover to reveal the key hole and insert and rotate the backup key (see Figure A).
- Insert the backup key and turn it.
- Then turn the knob clockwise to open the door.
Battery Installation
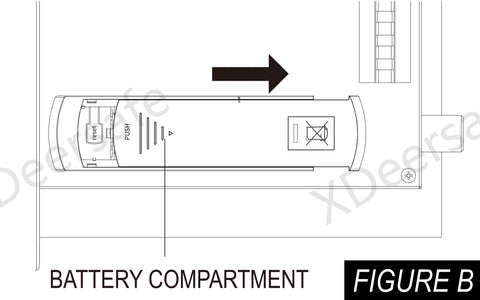
- Inside the safe, locate the battery compartment (see Figure B).
- Slide the battery cover to the right and insert 4 AA alkaline batteries (not included) into the battery compartment. Note Please note the "+" and "-" symbols (see Figure C). The "-" end of the battery is pressed against the spring in the battery compartment.
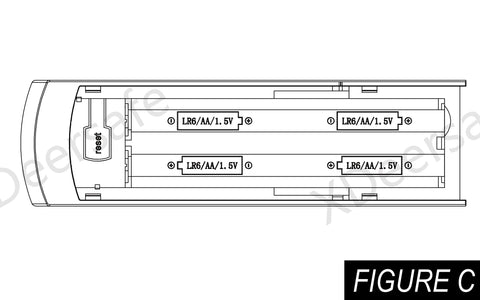
- When the battery is inserted correctly, the safe emits a short beeping sound.
- When you hear the beep, you are now ready to program the master code and fingerprint.
- - Always use brand new AA alkaline batteries, using other batteries may render the safe inoperable.
- - When you close the lid completely, your XDeer® safe will be locked, do not place the spare key inside the safe.
Master Code Programming
Default master code should be changed as soon as you first use it to prevent other persons accessing to your safe deposit box, so it should be kept confidential.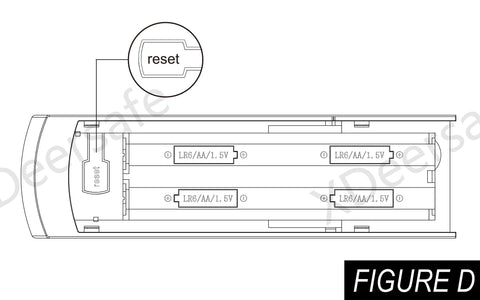
- Enter your master code or use backup key to open your safe, now start programming your new master code.
- After opening the safe, press the RESET button (see Figure D) and then release the RESET button, the indicator light will blink and a beep will sound.
- At this point, enter the new master code you want to program.
- After entering the new master code, press (just once) the RESET button, then release the RESET button. The light on the indicator light will blink twice and two beeps will sound. This beep will confirm that the new master control code has been programmed successfully.
- Now you can test your new master code (see Figure E). If you fail to program successfully, the indicator light will blink five times and five times beeps, the new master code will not work and you will only need to reprogram it from step 2.
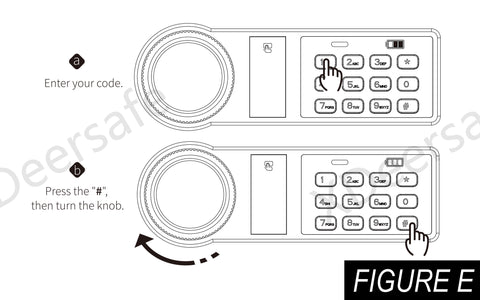
- After entering the master code and "#" key to confirm your master code, then turn the knob and the safe will be opened. When closing the safe door, please make sure to check if the safe is securely locked after turning the handle.
*PROGRAMMING TIPS
- The "#" key cannot be used as a code and it is the confirmation button.
- Your code can be a minimum of 3 and a maximum of 8 digits.
- Programming a new code will overwrite your previous code.
*Change Master Code TIP: Repeat this process to change the master code.
Installing the Adjustable Key Hooks
- Place the key hook parallel to the door fixing bracket.
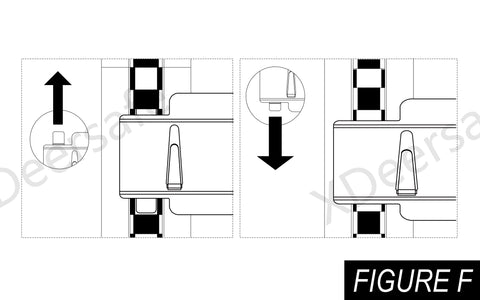
- Put the key hook "upper buckle" upward into the "slot" of the fixed frame(see FIGURE F).
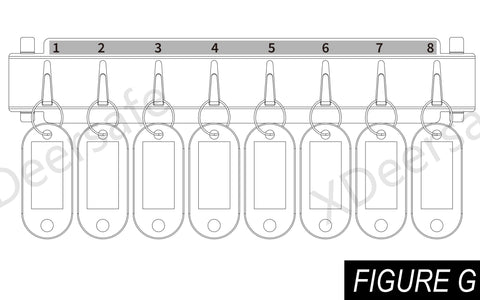
- Then put the key hook "lower buckle" downward into the "slot" of the fixed frame(see FIGURE G) to fix the key hook in the place youwant to install.
- *Note: The specifications of the key hook need to match the specifications of the fixed frame, otherwise it will not be fixed.
*TIPS
- The same method is used for the fixed frame inside the box.
- Parts are missing, damaged, or you need more, please contact us.
Organized Key Management
To make it easier to store and manage keys, the key hook is provided with a number. With the colorful key tags, you can keep your keys more organized(see FIGURE G).
Key hooks and stickers are independent (by default).
Attach the sticker to the key hooks according to your actual use.
Key Return Anti-theft Drop Slot
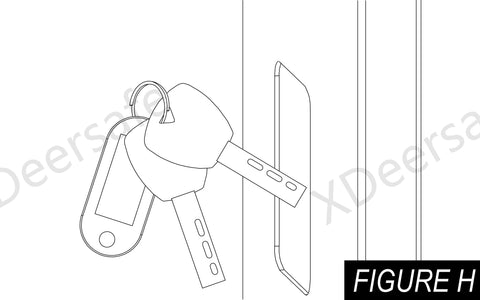
Here is a drop slot on the left side of the key safe for users to return or store their keys without having to open the safe(see FIGURE H).
When keys are dropped into the safe, there is a fleece blanket at the bottom of the safe to protect your keys.
Situation TWO (applicable for KS100-39 & KS100-50)
Differs from the KS100-30 in that a anti-theft drop slot door has been added to the slot on the left side of the key safe. This drop slot is anti-theft and protects the keys or other items in your key safe from theft. Other key safes on the market do not have this feature. Only XDeer has it.
How to use: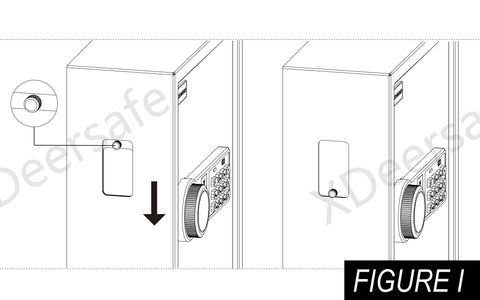
- The user pulls the door upwards on the "OPEN" position(see FIGURE I).
- At this point the user can place the key in the key safe.
- Make sure the key and key tag are fully inserted into the door space.
- Pull down the anti-theft drop slot door and the key will fall into the safe.
- NOTE: Please be careful and take care not to get your hands caught when using the anti-theft drop slot door.
Use Removable Anti-theft Drop Slot
If the key is stuck in the anti-theft slot, the anti-theft slot cannot be used properly. We recommend that you disassemble the anti-theft drop slot yourself.
The two screws on the internal and external anti-theft drop slot of the key safe should be unscrewed, and the anti-theft drop slot should be taken down from the inside of the key safe from top to bottom to remove the key in the anti-theft drop slot.
Install the anti-theft drop slot, reverse the above steps to complete the installation of the anti-theft drop slot.
*Tip: When installing, please pay attention to the direction of the slot where the key is placed.
Power Reminder
The indicator light on the right side of the fingerprint is the power reminder light. Press any key on the keypad to wake up the panel and check the battery level (see FIGURE J).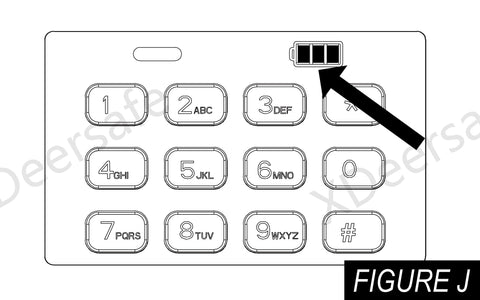
- NOTE: In the process of use, if the fingerprint light is always on pink light, it indicates that the power is insufficient and the battery needs to be replaced.
3-Cell: Sufficient Power, 1-Cell: Low Power
Using the Emergency Port
If you want to unlock your safe, but you cannot find a spare key, the safe has no battery or low battery, you can use the USB emergency interface to assist you in unlocking the safe.
The interface type belongs to Type-C (see Figure K).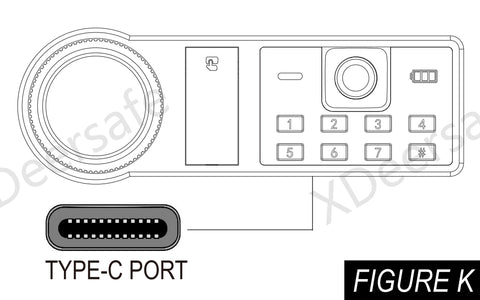
Use USB Type-C to unlock the safe with a mobile power , car power or home power, then use your fingerprint or master code, the safe can be unlocked.
- NOTE: Cannot charge the safe using USB connection power.
*Internal LED
In order to save the loss of battery power in the safe, the internal LED will only light up when using the master code and fingerprint to unlock, and the adapter interface connected to the power supply can not make the internal LED light always on.
Backup Keys Access
Access the Safe
The keyhole is located in front of the safe. Two backup keys are provided. In the event these are needed to open the XDeer® Safe, simply insert one of the backup keys, and turn the key to open the safe.
Securing Your Safe
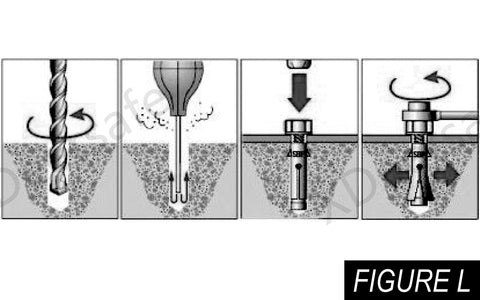
- According to the expansion bolt size, drill a hole in where you want to place the bolt.
- Clean up remaining debris in the hole.
- Hit the expansion bolt with fixing item into the hole.
- Tighten the nut using a wrench until the bolt expands.
*Tips:
If the wall is built by relatively soft brick, it may need to use the drill which is 1mm smaller than the suggested drill.
Air brick, foam concrete block, autoclaved aerated concrete are not suitable for these expansion bolts.
*Security Locking Mechanism
If you enter the wrong master code 5 times in a row, the keypad will be locked for 5 minutes (the indicator light and fingerprint light on the panel will flash continuously for 5 minutes ).
You can stop it by using the backup key to open it and remove the battery.
PRE-USE Instructions
Important Safety Instructions
- DO NOT use rechargeable batteries or any other type of non-alkaline battery.
- DO NOT mix old and new batteries. DO NOT mix alkaline and standard batteries.
- DO NOT lock the key and the USB cable inside safe.
- Connected USB port CAN NOT charge the battery.
- DO NOT leave the safe in extreme weather conditions. Battery power may be affected.
- DO NOT store loaded firearms in this unit. Firearms are serious in nature and must be treated with respect and stored responsibly.
Unpacking Guide
Using the Backup Key to Open the safe
- Press the top of the key cover to reveal the key hole and insert and rotate the backup key (see Figure A).
- Insert the backup key and turn it.
- Then turn the knob clockwise to open the door.
Battery Installation
- Inside the safe, locate the battery compartment (see Figure B).
- Slide the battery cover to the right and insert 4 AA alkaline batteries (not included) into the battery compartment. Note Please note the "+" and "-" symbols (see Figure C). The "-" end of the battery is pressed against the spring in the battery compartment.

- When the battery is inserted correctly, the safe emits a short beeping sound.
- When you hear the beep, you are now ready to program the master code and fingerprint.
- - Always use brand new AA alkaline batteries, using other batteries may render the safe inoperable.
- - When you close the lid completely, your XDeer® safe will be locked, do not place the spare key inside the safe.
Master Code Programming
Default master code should be changed as soon as you first use it to prevent other persons accessing to your safe deposit box, so it should be kept confidential.
- Enter your master code or use backup key to open your safe, now start programming your new master code.
- After opening the safe, press the RESET button (see Figure D) and then release the RESET button, the indicator light will blink and a beep will sound.
- At this point, enter the new master code you want to program.
- After entering the new master code, press (just once) the RESET button, then release the RESET button. The light on the indicator light will blink twice and two beeps will sound. This beep will confirm that the new master control code has been programmed successfully.
- Now you can test your new master code (see Figure E). If you fail to program successfully, the indicator light will blink five times and five times beeps, the new master code will not work and you will only need to reprogram it from step 2.

- After entering the master code and "#" key to confirm your master code, then turn the knob and the safe will be opened. When closing the safe door, please make sure to check if the safe is securely locked after turning the handle.
*PROGRAMMING TIPS
- The "#" key cannot be used as a code and it is the confirmation button.
- Your code can be a minimum of 3 and a maximum of 8 digits.
- Programming a new code will overwrite your previous code.
*Change Master Code TIP: Repeat this process to change the master code.
Installing the Adjustable Key Hooks
- Place the key hook parallel to the door fixing bracket.

- Put the key hook "upper buckle" upward into the "slot" of the fixed frame(see FIGURE F).
- Then put the key hook "lower buckle" downward into the "slot" of the fixed frame(see FIGURE G) to fix the key hook in the place youwant to install.
- *Note: The specifications of the key hook need to match the specifications of the fixed frame, otherwise it will not be fixed.
*TIPS
- The same method is used for the fixed frame inside the box.
- Parts are missing, damaged, or you need more, please contact us.
Organized Key Management
To make it easier to store and manage keys, the key hook is provided with a number. With the colorful key tags, you can keep your keys more organized(see FIGURE G).
Key hooks and stickers are independent (by default).
Attach the sticker to the key hooks according to your actual use.
Key Return Anti-theft Drop Slot

Here is a drop slot on the left side of the key safe for users to return or store their keys without having to open the safe(see FIGURE H).
When keys are dropped into the safe, there is a fleece blanket at the bottom of the safe to protect your keys.
Situation TWO (applicable for KS100-39 & KS100-50)
Differs from the KS100-30 in that a anti-theft drop slot door has been added to the slot on the left side of the key safe. This drop slot is anti-theft and protects the keys or other items in your key safe from theft. Other key safes on the market do not have this feature. Only XDeer has it.
How to use:
- The user pulls the door upwards on the "OPEN" position(see FIGURE I).
- At this point the user can place the key in the key safe.
- Make sure the key and key tag are fully inserted into the door space.
- Pull down the anti-theft drop slot door and the key will fall into the safe.
- NOTE: Please be careful and take care not to get your hands caught when using the anti-theft drop slot door.
Use Removable Anti-theft Drop Slot
If the key is stuck in the anti-theft slot, the anti-theft slot cannot be used properly. We recommend that you disassemble the anti-theft drop slot yourself.
The two screws on the internal and external anti-theft drop slot of the key safe should be unscrewed, and the anti-theft drop slot should be taken down from the inside of the key safe from top to bottom to remove the key in the anti-theft drop slot.
Install the anti-theft drop slot, reverse the above steps to complete the installation of the anti-theft drop slot.
*Tip: When installing, please pay attention to the direction of the slot where the key is placed.
Power Reminder
The indicator light on the right side of the fingerprint is the power reminder light. Press any key on the keypad to wake up the panel and check the battery level (see FIGURE J).
- NOTE: In the process of use, if the fingerprint light is always on pink light, it indicates that the power is insufficient and the battery needs to be replaced.
3-Cell: Sufficient Power, 1-Cell: Low Power
Using the Emergency Port
If you want to unlock your safe, but you cannot find a spare key, the safe has no battery or low battery, you can use the USB emergency interface to assist you in unlocking the safe.
The interface type belongs to Type-C (see Figure K).
Use USB Type-C to unlock the safe with a mobile power , car power or home power, then use your fingerprint or master code, the safe can be unlocked.
- NOTE: Cannot charge the safe using USB connection power.
*Internal LED
In order to save the loss of battery power in the safe, the internal LED will only light up when using the master code and fingerprint to unlock, and the adapter interface connected to the power supply can not make the internal LED light always on.
Backup Keys Access
Access the Safe
The keyhole is located in front of the safe. Two backup keys are provided. In the event these are needed to open the XDeer® Safe, simply insert one of the backup keys, and turn the key to open the safe.
Securing Your Safe
- According to the expansion bolt size, drill a hole in where you want to place the bolt.
- Clean up remaining debris in the hole.
- Hit the expansion bolt with fixing item into the hole.
- Tighten the nut using a wrench until the bolt expands.

*Tips:
If the wall is built by relatively soft brick, it may need to use the drill which is 1mm smaller than the suggested drill.
Air brick, foam concrete block, autoclaved aerated concrete are not suitable for these expansion bolts.
*Security Locking Mechanism
If you enter the wrong master code 5 times in a row, the keypad will be locked for 5 minutes (the indicator light and fingerprint light on the panel will flash continuously for 5 minutes ).
You can stop it by using the backup key to open it and remove the battery.


